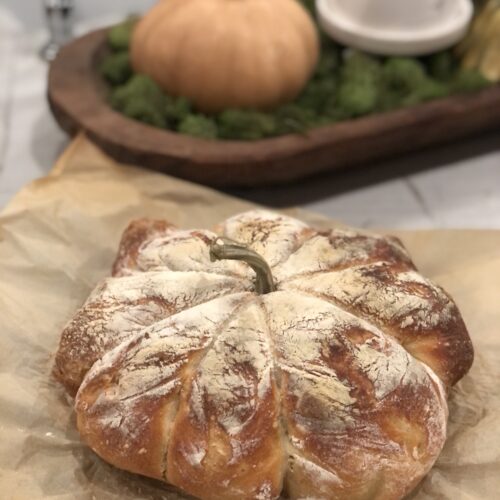
Pumpkin Shaped Sourdough Bread
This Pumpkin Shaped Sourdough Bread is perfect for any gathering in the Fall. You can make one big loaf or a bunch of littles. So fun and everyone will love not only the cuteness of the pumpkin but the taste of the yummy sourdough.
Ingredients
- 90 Grams Active Sourdough Starter
- 90 Grams Hard-White Wheat Flour (Freshly-milled)
- 325 Grams Artisan Bread Flour
- 330 Grams Water
- 11 Grams Real Salt
Instructions
- Make sure your Sourdough Starter is active. It should have lots of bubbles in it and have a great tang smell.
- Mix together the starter, water, AB flour and hard-white wheat flour with a Danish whisk until all ingredients are combined. Cover the bowl with a towel and let rest for 15 minutes.
- Sprinkle the salt on top of the dough. Mix together well. The dough should feel sticky.
- Place the bowl of dough, covered with a towel and let it ferment on the counter for 3-4 hours.
- Now, stretch and fold the dough towards you. This is basically lifting a section of the dough about 6-8 inches in the air and pulling it back down. Repeat this all around the bowl, each side every 30 minutes. Wet your hands, if necessary, to prevent the dough from sticking.
- Next step is to shape the dough. The dough should be smooth at this point.
- Sprinkle a little bit of flour on your counter. Place the dough onto the floured surface. Using a bench scraper, place it under the dough ball and start carefully moving the dough back and forth in a circular motion towards you. Try not to handle the dough too much.
- Final Proof: Place a lint-free towel (sprinkled with some flour) in the banneton basket and put the dough in the basket with the seam side up. Pinch the dough to make a seam. This is actually the bottom of the loaf. Cover the dough with another towel and then place the basket in a tied plastic bag. Put the bag in the refrigerator for 10-15 hours. It will now ferment and double in size when complete.
- Preheat your dutch oven at 450 degrees for one hour.
- Meanwhile, remove the bag from the fridge.
- You're going to need some kitchen twine. First, measure the length of your round loaf and cut four strips the same length.
- Put the twine strips in a small bowl and drizzle some olive oil over them. Coat them well so they don't stick to your loaf while it's baking. It will be harder to pull the strings off once the bread has baked if you don't soak them in the oil.
- With bowl right side up (straight from the refrigerator), place each strip crossing over like the photo below.
- Next, grab a piece of parchment paper and lay on top of the string. Take a plate or cookie sheet and now, flip it over on the counter.
- Now, you'll remove the bread from the banneton bowl being careful not to mess with the twine strips.
- Gather a set of opposite strips and bring them together, tie a loose knot. Repeat the other three strips the same way.
- It should look like the indention of a pumpkin. (See my photos)
- Remove the dutch oven from the oven and place your bread and parchment paper inside. Spritz lightly with water. Cover with lid and bake for 25 minutes. Remove the lid and bake for 20 more minutes. The crust will be golden.
Notes
* You can add some wheat scoring on each indention, if you like. When scoring your bread, rub a little bit of AP flour on top of the loaf and then make your pattern. It will show better once it’s baked this way.
* Your finished bread loaf should be nice and springy inside. If it’s not, no biggie. Just keep trying.
* This will make a great addition to any fall gathering or give a loaf as a hostess gift.